


CSS can get really bulky and can also get frustratingly hard to manage. It can be a friend or a real pain in the ass, lol 😅.
In this article, you'll learn how to install and apply tailwind to your project. And at the end of this article or let's say before I drop my pen 😂, You would have found a way to being the boss of your CSS styles because with Tailwind writing CSS becomes more flexible and less frustrating.
So, how can Tailwind help us take control and be the boss of our CSS styles? Let's find out...........
What the hell is Tailwind CSS 💁
According to the official documentation, Tailwind is a "utility-first" CSS framework that provides a deep catalogue of CSS classes and tools that will help you achieve awesome user interfaces without writing a single line of your own CSS. Tailwind provides us with a toolbox of different helper classes(utilities) that we can put together and style a component by applying it to its HTML elements.
Another exciting part is that it also allows us to customize and add our own CSS classes. It's scalable and easily adapts to any design.
Getting started with Tailwind
You can add tailwind to your project using its CDN or via a package manager which is the best and recommended approach because it gives us full access to its functionality and many other of its nice features.
Prerequisite: Pls before continuing with this article, make sure you have the following installed on your PC:
- node
- npm : (which is the package manager we'll be using for this article)
If you're not sure you have them installed, run the below commands one after the other:
//node
node -v
//npm
npm -v
If you don't: click on this link to install node.js and npm
. . .
Alright.... so let's get started. No worries 😁, I'll try to make it a smooth ride.
Okay...... let's begin 💃
Step 1:
Create a folder and name it tailwindcss.
Open the empty folder you created in your favourite code editor mine is (VS code).
Be sure you're in the tailwindcss folder you created.
Create a package.json file by
running the below command in your terminal.
npm init -y
This command will create a package.json file that will contain project information and all dependencies required to run the project.
Using npm init -y instead of just npm init simply generates a package.json file using the default settings rather than asking questions. More on npm init here.
Step 2:
The next step is to create all required dependencies for the project using the below command.
npm install -D tailwindcss@latest postcss@latest autoprefixer@latest
This command installs 3 development dependencies for your project.
You will find all these packages when you open the package.json file.
Below are links to the dependencies, you can check them out.
Step 3:
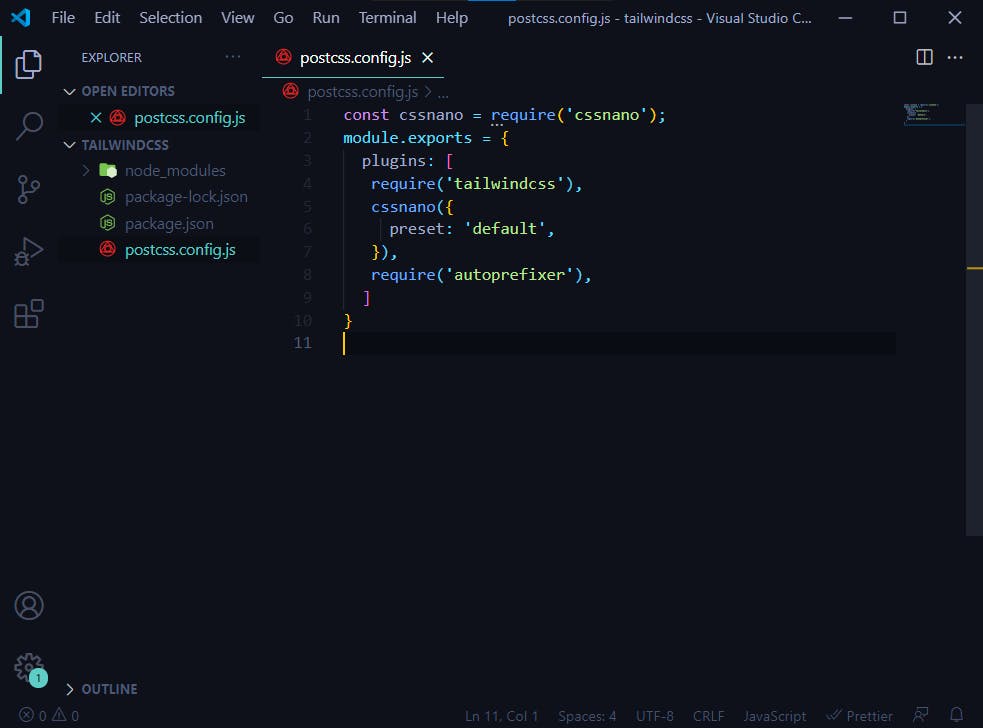
Create a file called postcss.config.js in the root directory of your project, copy the code below into it and save.
const cssnano = require('cssnano');
module.exports = {
  plugins: [
   require('tailwindcss'),
   cssnano({
     preset: 'default',
   }),
   require('autoprefixer'),
  ]
}
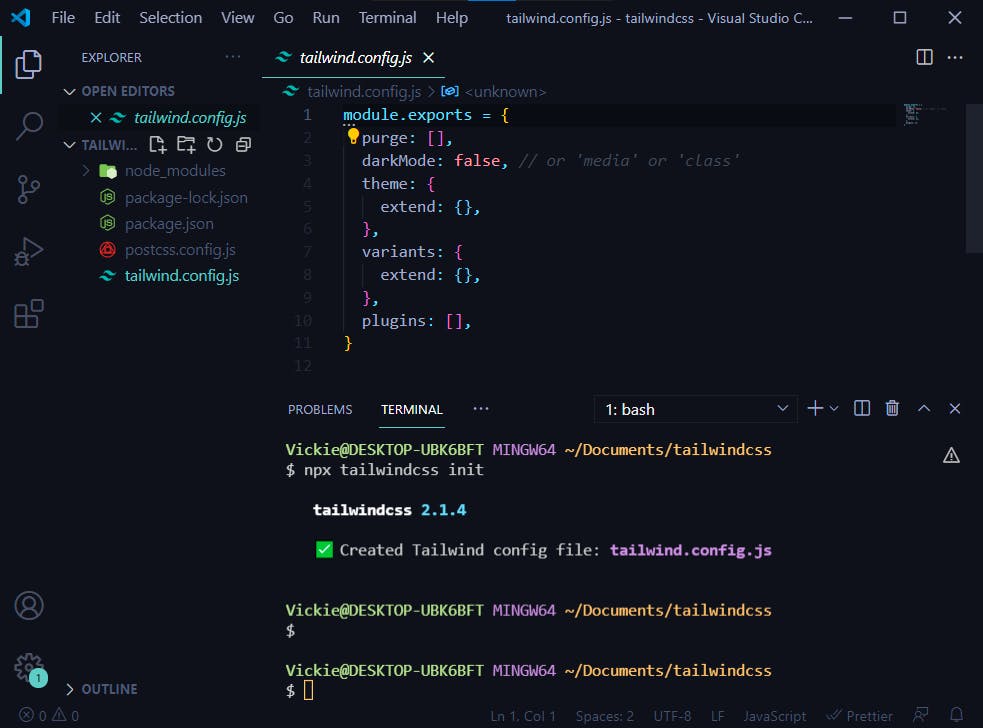
Step 4:
Running the command below will create a tailwind.config.js file in the root directory of your project folder.
npx tailwindcss init
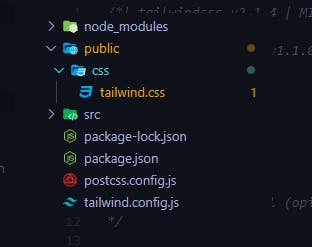
If the above command was successful, your file structure should be like this:
Step 5:
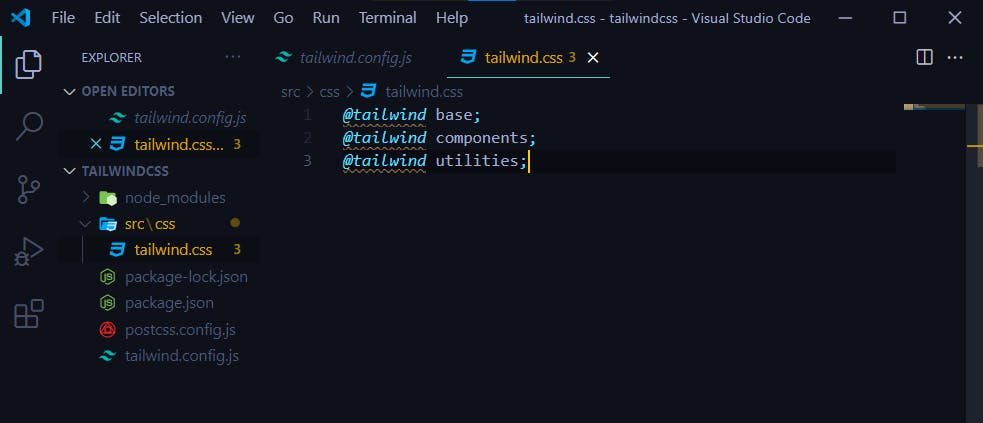
Now that we're done with the configuration. We're now going to create some folders in our project folder.
Create a folder called src, also create a css folder in the src folder. Lastly, create a tailwind.css file in the css folder.

Inside the tailwind.css file you need to inject 3 base packages of tailwind.
Add the following lines of code in your tailwind.css file.
@tailwind base;
@tailwind components;
@tailwind utilities;
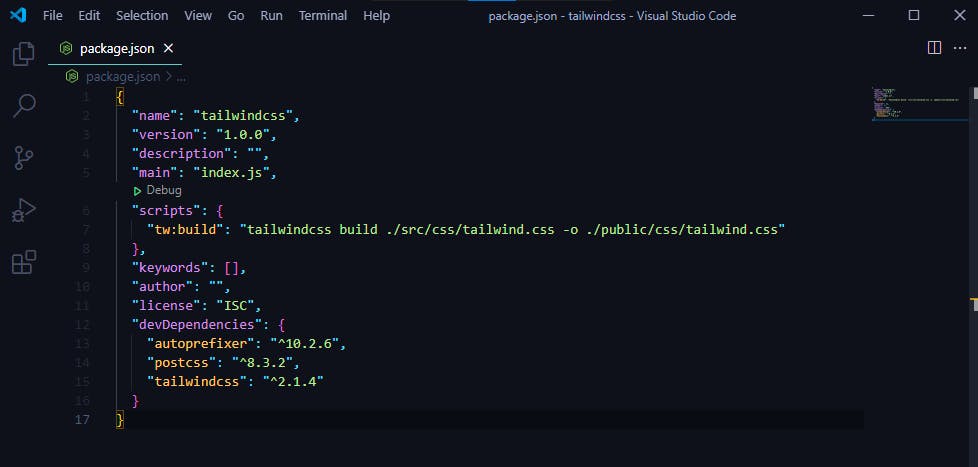
Step: 6
Now we'll make some changes in the scripts of our package.json file.
Replace your scripts with the below.
  "scripts": {
    "tw:build": "tailwindcss build ./src/css/tailwind.css -o ./public/css/tailwind.css"
  },
Your package.json should look something like this :
Okay, now we are done adding the script to build the tailwindcss library to our package.json file but we still need to run it via our package manager.
So, go ahead and run the below command in the terminal.
npm run tw:build
This command will generate a CSS file into ./public/css/tailwind.css that will be available for use in your project.
Here's what the project directory would look like:
Step 7:
Oh yeah, we have made progress.......
So we're done generating our tailwind.css file with help of our tw:build scripts property in our package.json file.
Now inside the /public folder create an HTML file named index.html and am going to add my basic HTML structure.
Make sure to link the generated tailwind.css file to your index.html file.
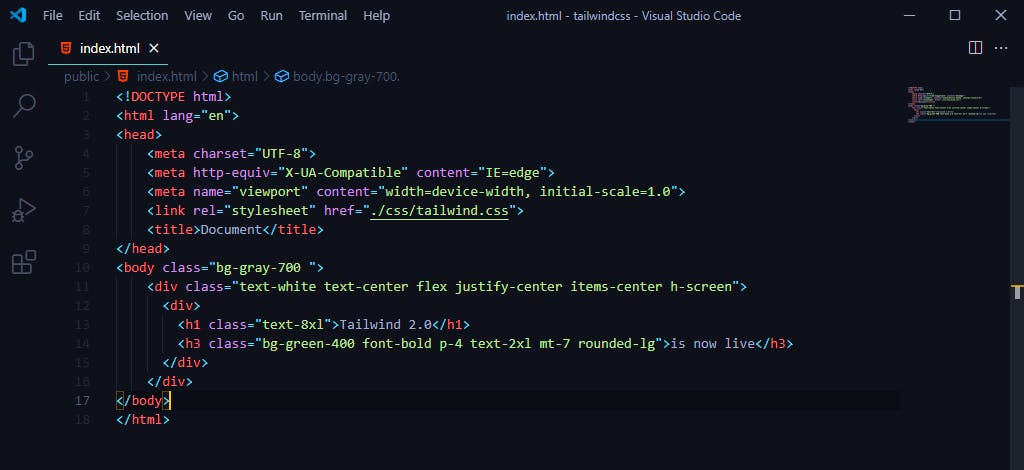 You can copy and paste this or if you prefer writing this out in your editor, that's fine too 😊.
<!DOCTYPE html>
<html lang="en">
<head>
    <meta charset="UTF-8">
    <meta http-equiv="X-UA-Compatible" content="IE=edge">
    <meta name="viewport" content="width=device-width, initial-scale=1.0">
    <link rel="stylesheet" href="./css/tailwind.css">
    <title>Tailwind Installation</title>
</head>
<body class="bg-gray-700 ">
    <div class="text-white text-center flex justify-center items-center h-screen">
      <div>
        <h2 class="text-3xl text-green-100 pb-7">yay, congrats on your installation</h2>
        <h1 class="text-8xl">Tailwind 2.0</h1>
        <h3 class="bg-green-500 font-bold p-4 text-2xl mt-7 rounded-lg hover:text-gray-500 hover:bg-green-200 shadow-2xl cursor-pointer">is now live</h3>
      </div>
    </div>
</body>
</html>
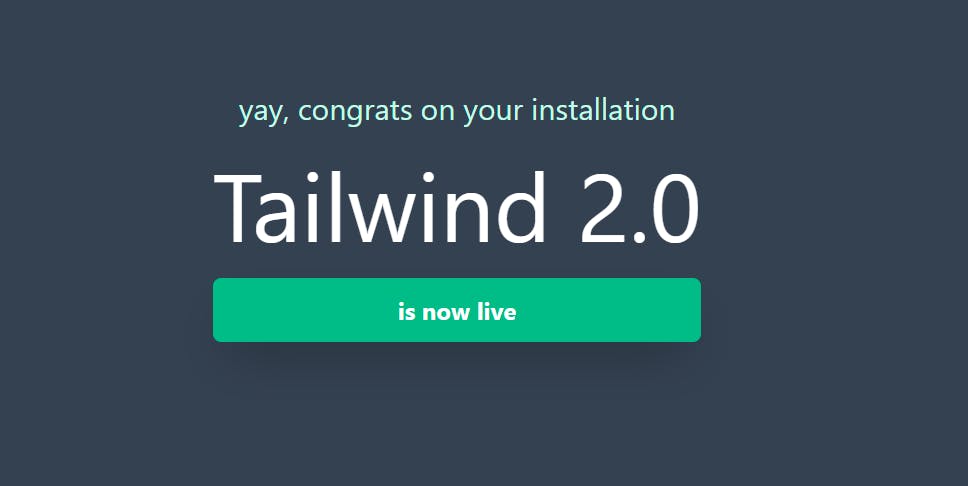 If you have the above as your output then
 yay congrats💃, you have successfully installed the Tailwind CSS library v2.0.
I'll love to hear from you, leave your comments, any improvement you feel could be added to this article, or perhaps any errors you faced while doing the above setup.
I want to give a big thank you to the organizers and mentors of the CodeVixens mentorship program. Being a mentee in this mentorship program has greatly impacted my career, I really appreciate the effort you're putting into creating a better tomorrow. God bless and enrich you greatly.
Also a special thank you to my mentor Voke Junior, you always follow us up, making sure we complete our given tasks. Thank you so much.
Feel free to reach out via -- email: adedayovicky123@gmail.com, twitter or Linkedin
Thanks for reading! Happy Coding! 🎉